
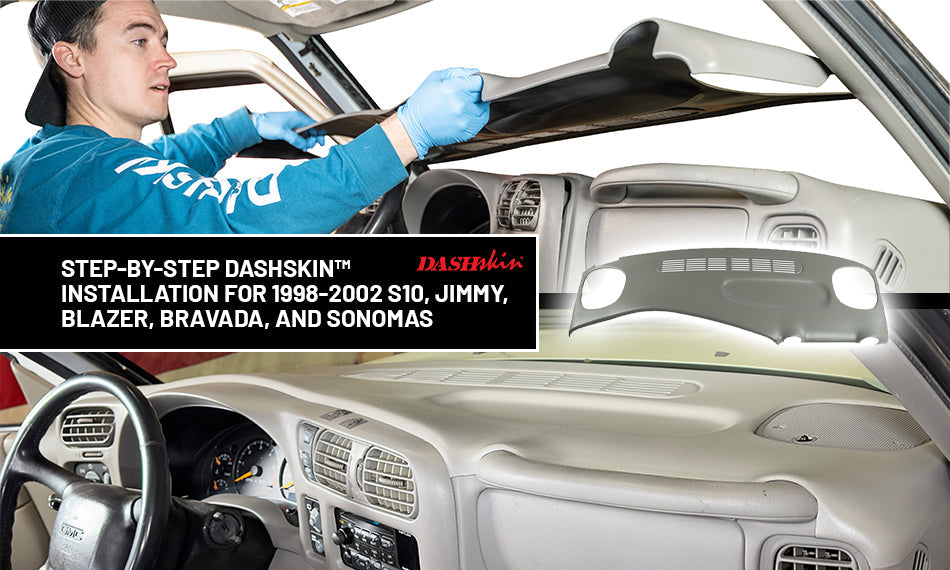
Welcome to our detailed installation guide for the DashSkin™, designed for the 1998-2002 S10, Jimmy, Blazer, Bravada, and Sonomas models. This step-by-step guide will help you achieve a professional and flawless installation of your DashSkin™.
1. Verify Your Trim Color
Before starting the installation process, it's crucial to ensure you have the correct DashSkin™ color for your vehicle.
-
Locate Your Trim Code: Open the glove box of your vehicle and find the trim code label. This label contains important information about your vehicle's interior color.
-
Compare with Trim Code Guide: Use our Trim Code Guide to match your trim code with the available DashSkin™ colors. This ensures the new DashSkin™ will blend seamlessly with your vehicle’s original interior.

2. Cleaning and Preparing the Dash
Proper cleaning and preparation are essential for a successful installation.
-
Choose a Degreaser: Select a commercial-grade degreaser such as Zep Purple, Power, or Simple Green. These products are effective at removing oils and grime from the dash surface.
-
Clean Thoroughly: Apply the degreaser to the original dash and clean it thoroughly. Make sure all dust, dirt, and residue are removed to ensure a strong adhesive bond.
3. Dry Fitting the DashSkin™
Dry fitting is a critical step to ensure proper alignment and fitment.
-
Place the DashSkin™: Lay the DashSkin™ over your existing dash without applying any adhesive. This will help you check for alignment and identify any potential issues.
-
Align the Front Lip: The front lip of the DashSkin™ should tuck behind the bezel. Use a plastic putty knife to gently pry the bezel away from the dash if necessary, but do not remove it completely.
-
Plan for Weights: Determine where weights will need to be placed to ensure even pressure during installation.
4. Applying Adhesive
Correct application of adhesive is crucial for a secure fit.
-
Prepare the Silicone: Use the silicone adhesive recommended in the installation guide. Ensure it is compatible with your DashSkin™ material.
-
Apply the Adhesive: Follow the pattern outlined in your install guide. Apply the silicone evenly to the underside of the DashSkin™ where it will make contact with the original dash.
5. Installing the DashSkin™
Proper placement and alignment are key to a successful installation.
-
Position the DashSkin™: Carefully place the DashSkin™ onto the original dash. Ensure all edges and seams align perfectly.
-
Press and Adjust: Gently press down on the DashSkin™ to secure it. Make any necessary adjustments to ensure a smooth and even application.
6. Securing the Bezel
Ensure the bezel and DashSkin™ are properly fitted.
-
Press the Bezel Back: Once the DashSkin™ is in place, press the bezel back onto the dash. This helps secure the DashSkin™ and ensures a clean finish.
-
Use Cardboard if Needed: If you have trouble placing weights near the windshield, cut pieces of cardboard and wedge them between the dash and the windshield. This helps maintain pressure and position.
7. Applying Weights
Weights help to ensure that the DashSkin™ adheres properly.
-
Choose Your Weights: You can use sandbags, reams of printer paper, or phone books as weights. Distribute them evenly across the surface of the DashSkin™.
-
Apply Even Pressure: Place the weights strategically to cover the entire DashSkin™. This ensures that the adhesive bonds uniformly and that there are no air pockets or loose areas.
8. Final Touches
Complete the installation process with these final steps.
-
Remove Weights and Cardboard: Allow the adhesive at least 6 HOURS to cure before removing your weights. Drier environments (low relative humidity) require longer curing time. If possible, leave the vehicle overnight for best results. Once cured carefully remove the weights and any cardboard pieces used for support.
-
Inspect the Installation: Check the DashSkin™ for any areas that may need additional adjustments or touch-ups. Ensure that all edges are securely bonded and that the surface is smooth.
Conclusion
Thank you for choosing DashSkin™! We pride ourselves on delivering high-quality products made in the USA. With proper installation, your new DashSkin™ will enhance the appearance of your vehicle's interior, providing a fresh and stylish look. For any questions or additional assistance, feel free text our customer support team at (918)940.8900